Table of Contents
Features of the Permissions Manager
Customizing Permissions for Individual Users
Procedure for Updating Permissions for New Tools Added to the System
Features of the Permissions Manager
When a new user is set up in the system, they start out having access to nothing in the system. For a user to have access to any of the tools within the system, they must be granted permission via the Permissions Manager tool.
The Permissions Manager is found under User Tools on the Main Navigation.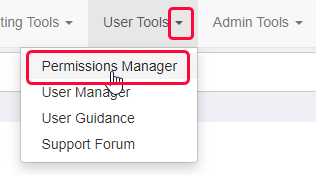
The Permissions Manager has 2 view tabs. One is for individual Users and the other is for Groups of Users.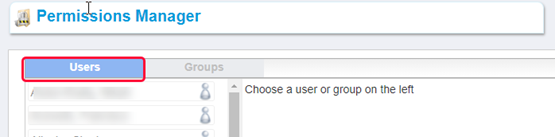

Usually, a new user is added to a predefined group of users with similar permissions.
Here is the scrollable Tools area and the scrollable Users area for a Group. The difference for a group is the users are listed below as choices: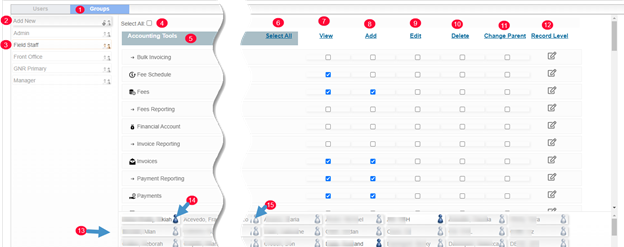
- Tab Name
- Add New button – Create a new group. Once created, it cannot be deleted by a user.
- Group name – Created groups are listed in alphabetical order and when clicked on, display the permissions set for that group.
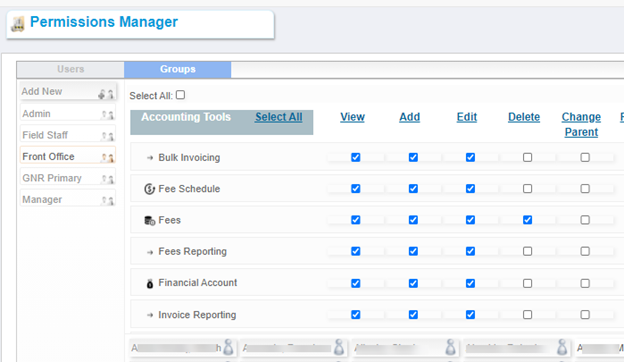
- Select All check box – When checked, all access, to all current tools, is granted.
- Main Navigation Name with menu choices below – These are all listed alphabetically.
- Select All – Clicking, selects all tools of that specific category. The boxes are automatically ticked.
- View – Clicking, selects all tools of that specific category. The boxes are automatically ticked. Users will be allowed to view records.
- Add – Clicking, selects all tools of that specific category. The boxes are automatically ticked. Users will be allowed to add records.
- Edit – Clicking, selects all tools of that specific category. The boxes are automatically ticked. Users will be allowed to make and save changes.
- Delete – Clicking, selects all tools of that specific category. The boxes are automatically ticked. Users will be allowed to delete records. This should not be ticked for most users. Individual user permissions can be granted.
- Change Parent – Clicking, selects all tools of that specific category. The boxes are automatically ticked. Do not use this unless part of data cleanup.
- . Record Level – This can be customized to restrict a subset of users from access. HealthSpace staff would set this up during system configuration.
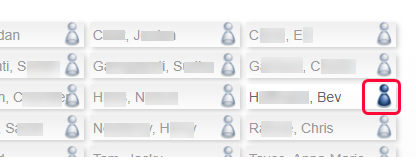
- All Users – The users names, sorted alphabetically from left to right, by last name and then first name, are displayed in a separate scroll box.
- Selected user icon – To add a user to the group, the “Person” icon is clicked so that the icon is blue.
- Unselected or deselected user – Users that are not in this group show the “Person” icon as grayed out (muted color).
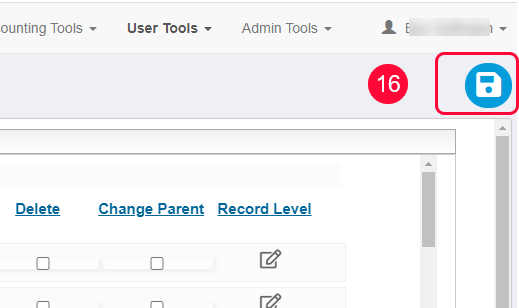
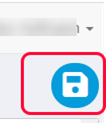
- Save changes Icon – After settings have been changed, click on the icon that looks like a “floppy drive”. It is located on the top right-hand side of the screen.
Setting up a Group
Many employees have the same set of duties, therefore a Group should be created to facilitate and control permissions to sections of the system. How the permissions are grouped is according to how the main navigation and the tools associated with a category are set up. Therefore, the navigation should be set up properly before assigning permissions.
- Click on Permissions Manager from User Tools on the main navigation.

The page displaying the two tabs is shown and defaults to the Users view.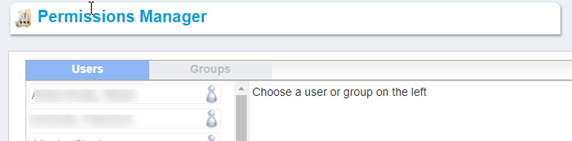
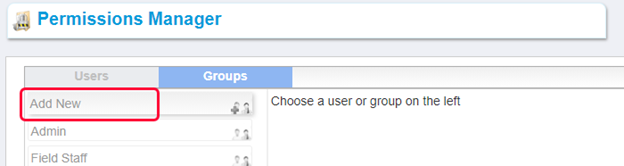
- Click on the Groups tab.

- Click on Add New List Screen.
- A small box will open in the middle of the screen with an area to type in the Group name:
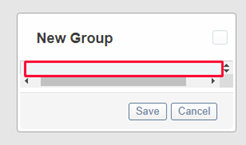
- Type the Group name. Check the spelling BEFORE CLICKING ON THE SAVE BUTTON.
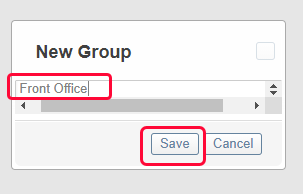
This entry will be saved to the system and CANNOT be deleted by any users.
The new Group opens. The Group currently opened is shown by a darker colored aspect to the choice.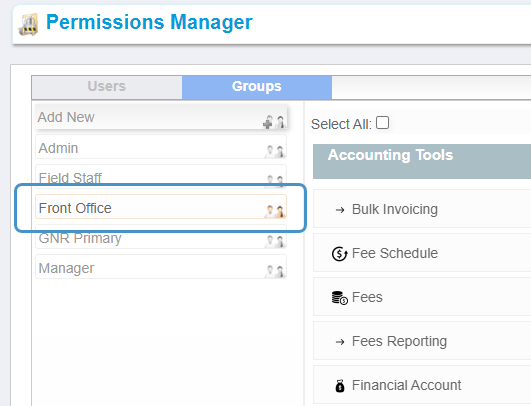
- Using the selection features outlined in the previous section, fill out the permissions for that specific user group:
- After setting permissions for a group would be a good time to save them by clicking on the Floppy Drive Icon. Then start selecting the users.

- To select the users, find the name ordered by last name in the bottom panel of the screen and click on the “Person” icon. When the icon changes color to blue, the name is selected.
- After selecting the users, save the Permissions Manager with the “Floppy Drive icon. Otherwise, if the page is closed or the cache cleared, all changes will be lost.
When the user logs in again, the Navigation Categories and the Tools associated will be available to use as set out in the permissions. If no permissions were set for a Navigation category tool, the user will not see that on the Main Navigation.
Customizing Permissions for Individual Users
A user may belong to a group but have additional duties that require additional permissions granted to access more of the system. In the hierarchy of permissions, individual permissions are considered first. Therefore, if a user has additional permissions required, their record remains selected in the Group assigned but their individual record is edited. For example, this user is part of the Front Office Group who do not have access to Reporting. This individual needs access for weekly reports they supply to their supervisor.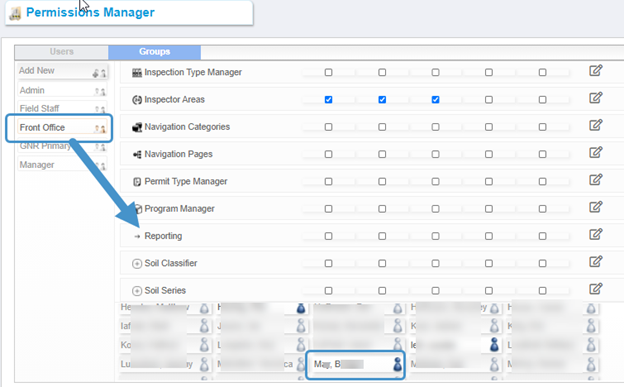
- Click on the Users tab, scroll to the user’s name. Scroll to the Category and tick the tool.
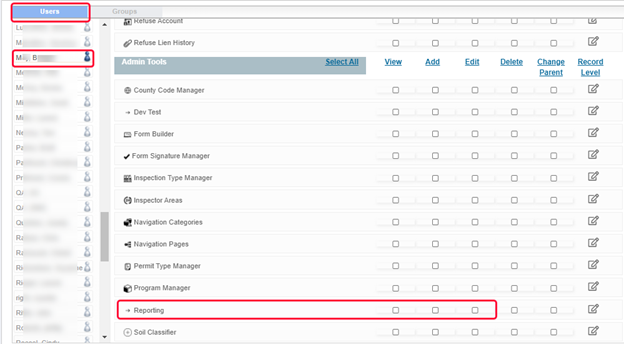
- Save the changes by clicking on the “Floppy Disk” icon.

The user will need to log in again or Clear Cache to see the changes.
Procedure for Updating Permissions for New Tools Added to the System
If a new tool is added to the system, and is in the Navigation, it cannot be automatically assigned to users. The Select All buttons were to tick what was previously in a category and can be used again to include new items.
The process is manual. The Administrator with rights to the Permission Manager will need to assign the new tool to their own permissions; Clear cache to see the changes in the Navigation; then update any Groups or Individual users.