Table of Contents
Introduction
Getting Started QuickStart Guide
Icons and Definitions
Step-by-Step Instructions
Installing HS Touch from the Microsoft Store on a Device
Logging In and Exiting Out of HSTouch
Select a Facility to be Inspected
Completing an Inspection
Completing the Violation Entry of the Inspection
Inspection Report QuickStart Guide
Selecting Additional Violation Codes From the Same Number
Editing (modifying) a Saved Violation
Deleting a Violation or Other Violation Record
History Information
Exiting and Returning to an Inspection
Completing the Other Menus
General Info
Photos
Food Temperatures, Pool data, etc.
Previewing the Print Report
Finalizing, Uploading and Emailing the Inspection Report
Uploading Data to HealthSpace Cloud from the Sync Center
Correcting Data Input Errors
Resending Records from HSTouch
Removing Records from HSTouch
Conclusion
Introduction
Welcome to the Windows 10 app called HealthSpace Touch. In the documentation it will be referred to as HSTouch or HST.
HSTouch was designed with field inspectors in mind. Over the past two decades, the HealthSpace team has worked with hundreds of inspectors across North America.
Whether you’re making the jump from paper or laptop-based inspection reporting, you’ll be amazed at how fast and easy it is to enter data in HSTouch. You have access to all the codes, regulations and violation reporting tools you need within a couple of taps.
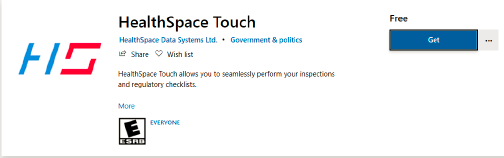
HealthSpace Touch is downloaded from the Microsoft Store using the Search Criteria “HealthSpace Touch”.
In this manual you will find information that will help you download Establishment Facilities on your calendar to visit that day. Once the Facilities are on the device, the inspections can be started whether connected to the internet or not.
There are also definitions and explanations of each operation in recording all aspects of the inspection. QuickStart Guides and Step-by-Step. Once you know the system, you can use this article as a reference.
Getting Started QuickStart Guide
- Open the HealthSpace Touch App on a Tablet or Windows 10 PC.
- Make sure the Tablet or PC is connected to the internet.
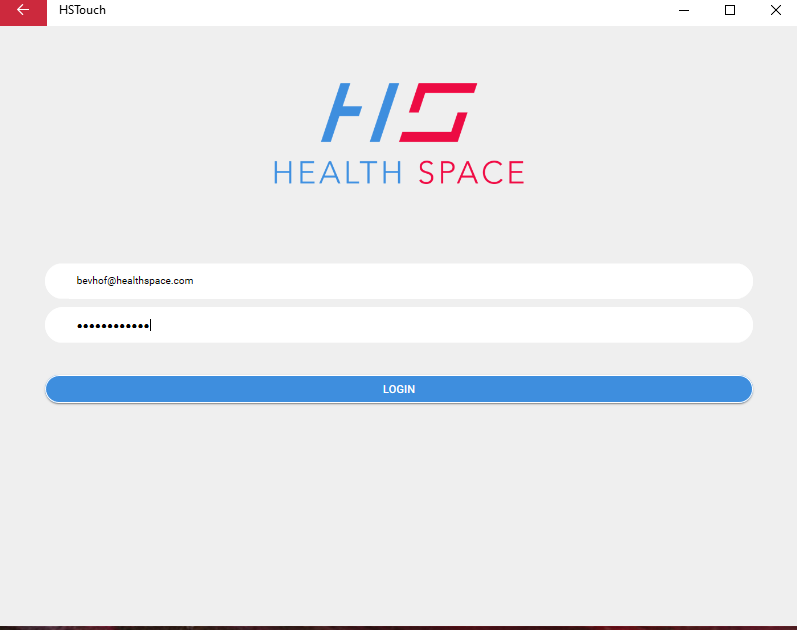
- Enter the assigned HSTouch login associated Email address and Password, then click the login button or press Enter/Return/Go on the keyboard.
- From the ‘Sync Manager’, select “Start Download” to refresh the Facilities library and/or “Run Update” for any program design changes
- To begin, select the “Search” icon.
- Type in a keyword or an address in the “Search” bar to begin the search.
- Select the facility or facilities to be inspected, from the search display, by clicking the black download indicator.
- Repeat steps 5, 6 and 7 until all facilities have been downloaded and are listed in the “List View” under UPCOMING INSPECTIONS. This will ensure the ability to conduct the inspection if internet connectivity is not available when onsite.
- Return to the “List View”.
- Press or click on the name, for the location you would like to inspect.
- To do an inspection using HSTouch go to Starting an Inspection or Inspection Report QuickStart Guide in this manual.
Icons and Definitions
Inspection Home Page: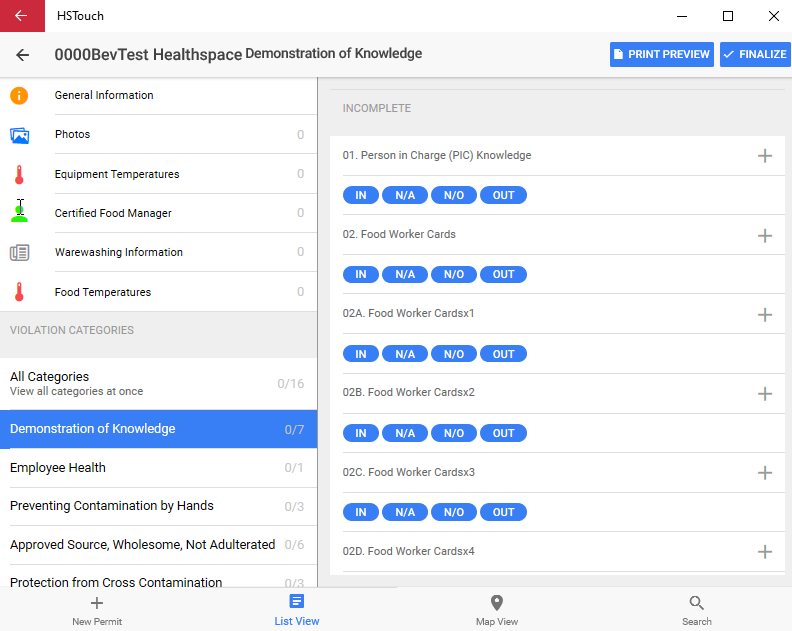
HS Touch Icon - 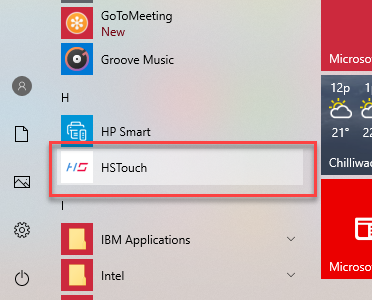
Sync Manager Icon - 
Sync Manager Menu -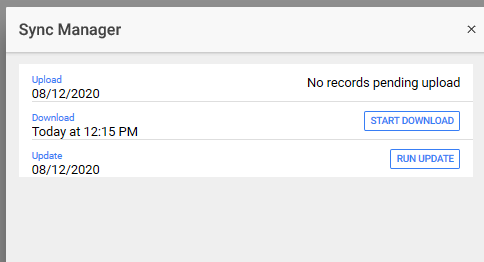
View Menus - 
The selected item will be colored blue.
Download Facility Icon - 
Downloaded Facility Icon - 
Item History – When a facility has had a violation, in the past, the history is available by clicking on the  link that is shown after the Violation in (any) Category view
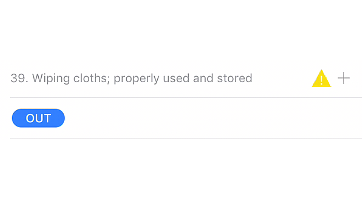

Calendar: - 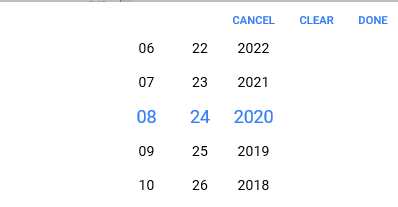
Time: -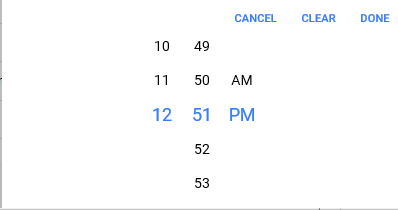
Back Button -  or
or  or
or 
Step-by-Step Instructions
Installing HS Touch from the Microsoft Store on a Device
- If you are already using an earlier version of the App that was downloaded from the Microsoft Store, DO NOT DELETE IT! This would cause the loss of data already accumulated in the program.
- After confirming you are connected to the Internet, open the Microsoft Store on your device.
- Search for Healthspace Touch.

- Press on the Get icon to download or the update button depending on the situation.
- Wait while the program downloads.

- If, at any time you see an Update button, make the update.
- Click on Launch.

- Enter your login credentials with assigned email address and password. Make sure the device is connected to the internet.

- Press the Sync button and choose “Start Download” and "Run Update to refresh the data.

- You may now search for facilities to inspect. Or if not continuing, exit the program.
Logging In and Exiting Out of HSTouch
- On the device, find the HSTouch icon on the screen and press.
- Enter your login credentials with assigned email address and password. Make sure the device is connected to the internet.
- Press the Sync button and choose “Start Download” to refresh the Facilities list. Also, choose “Run Update” for updates to the system if needed.
This is an important step that should be done each day when you are opening the system as backend design elements may have been added to the program, and could cause errors in previous versions.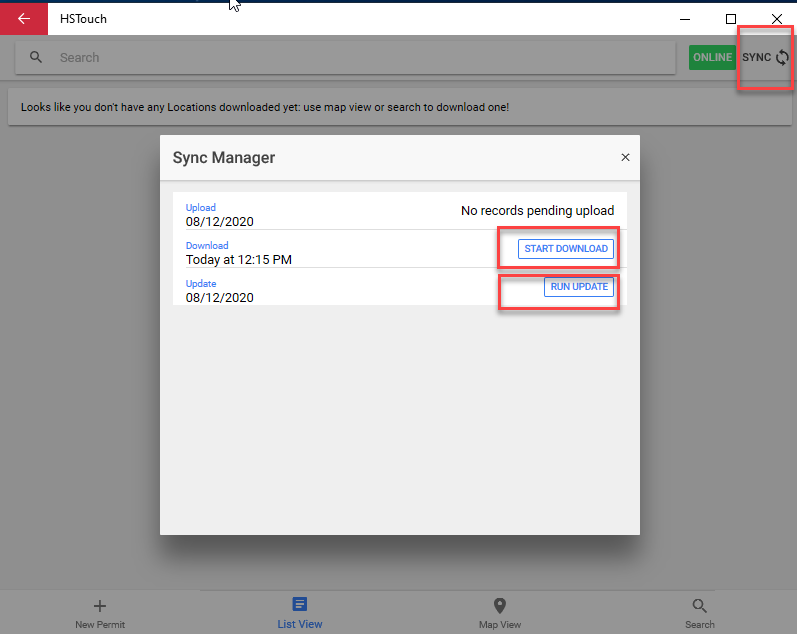
- To Exit, click or touch the X at the top right-hand of the screen.

Select a Facility to be Inspected
While connected to the internet, the facilities to be inspected are downloaded to the device.
The steps to download the information are as follows:
- From the main screen, press the “Search” icon at the bottom right of the screen.

- Press in the Search bar to activate the keyboard and type the criteria of the search.

- NOTE: The data is a “Full Text Search” and the use of “Wildcards” is permitted.
- Type in a keyword or address and press the “Return” button on the keyboard to begin your search.

- This will display all locations containing the search criteria.
Select one or more facilities by tapping the download icon on the right hand side of the facility list.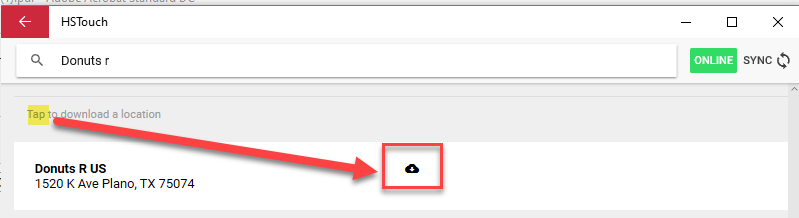
The icon changes to a green circle with a checkmark.
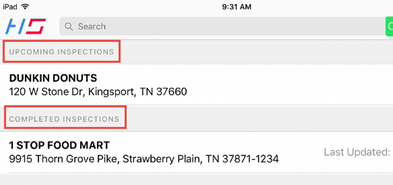
- Tap “List View” at the bottom of the scren to see the facility or facilities downloaded.

- This is the usual display of the screen. It shows the newly downloaded facilities as “Upcoming Inspections” and any facilities that have been Finalized as “Pending Upload Inspections” (Not shown here). “Uploaded” from the Sync Manager to the Cloud, as “Completed Inspections”.
Completing an Inspection
Once the facilities are listed as “Upcoming Inspections”, the inspection can be done while connected or disconnected to the internet. While off line, some features of the iPad or Tablet will not be available, such as Siri and the ability to send email.
To start the inspection:
- From the List View, touch the name of the facility and choose the module.

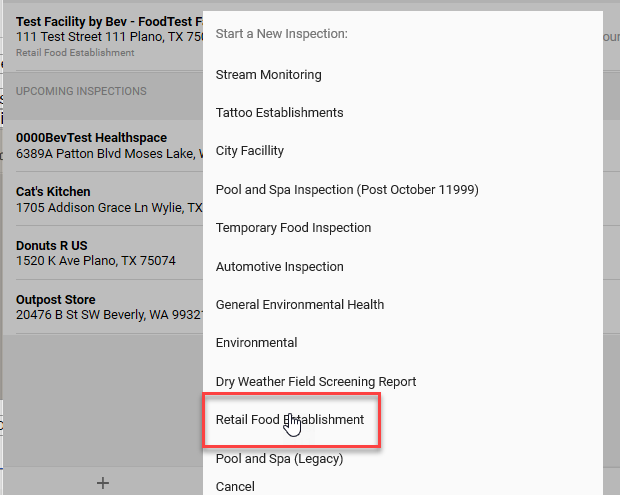
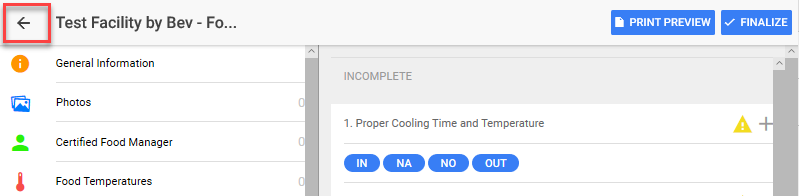
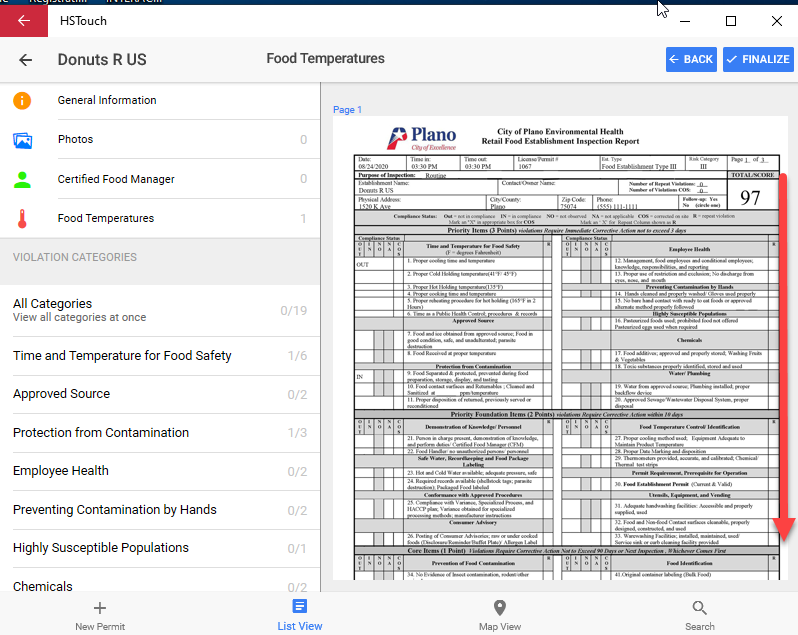
The inspection form is displayed, showing the first category, eg: Time and Temperature for Food Safety.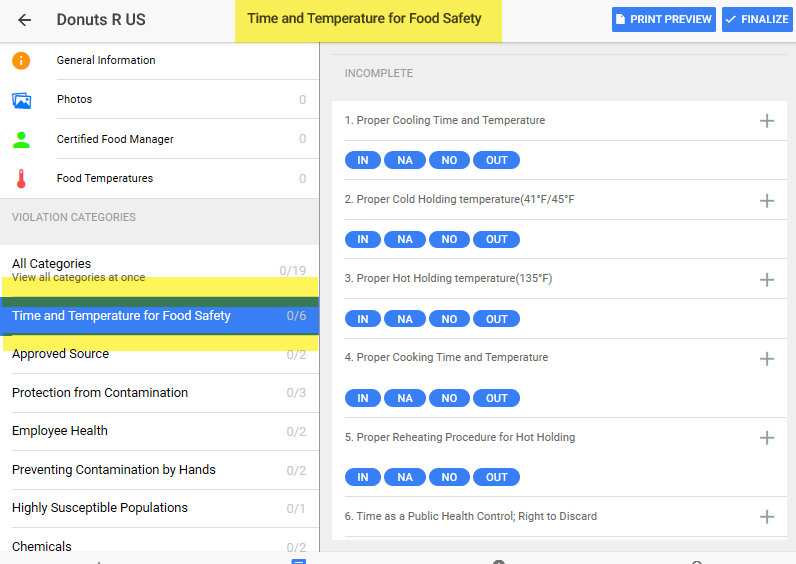
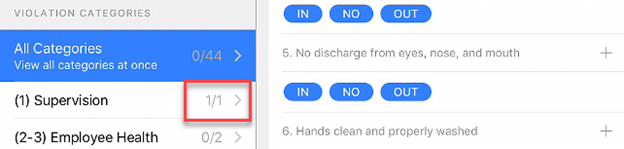
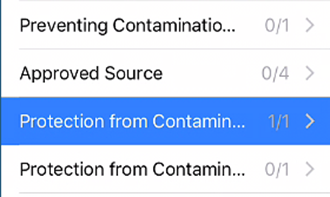
At this point, the view can be changed to All Categories or any of the other individual categories: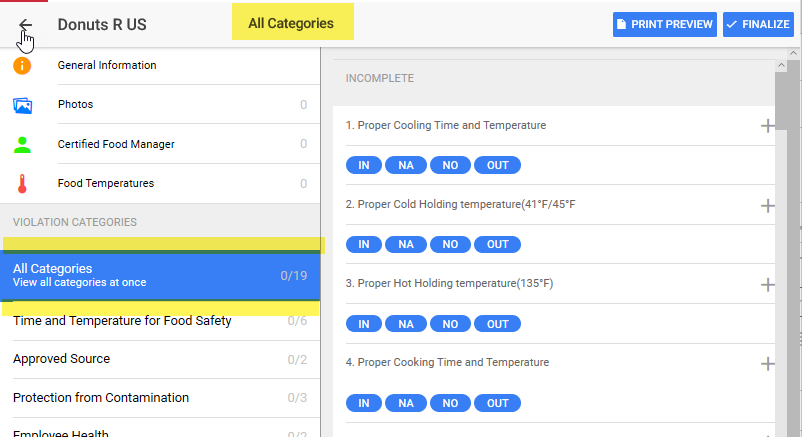
Completing the Violation Entry of the Inspection
Here is an overview set out as the:
Inspection Report QuickStart Guide
-
- See violations using a category selection
- For each violation number select an observation such as: OUT, IN, N/A or N/O as applicable
- If OUT is selected, choose Corrected Onsite or Repeat if necessary.
- If OUT is selected, choose the specific violation code from the screen, if codes are being used.
- If OUT, add “canned comment” or type or “say” your own comment
- If more than one violation code, press plus sign and select OUT again and complete (only available in individual category view)
- Fill out all mandatory fields in the top left menu choices. Eg Inspection Date, Follow-up etc.
- Preview the report
- Finalize the report and Upload if connected to the internet
- Email the report to the Facility and yourself if connected to the internet
- Upload the data from the Sync Manager once connectivity is established (DO NOT KEEP MULTIPLE INSPECTIONS ON THE DEVICE WITHOUT UPLOADING).
Continuing with the inspection:
For this example, a single category has been selected.
- To start, touch the button that shows the status of the violation category (Later the plus and arrow icons are used to edit a violation or select another violation in that number).

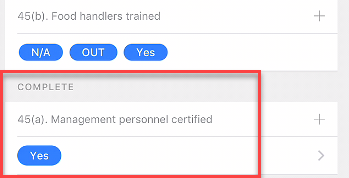
- How to complete for an IN:
- If the violation is pressed as IN, the default is to automatically save the IN. No further input is necessary.
- The system can also be set up to select an IN and type or select a predefined comment if needed. (Screenshots may vary)
- Press on Save. This means any violation associated with this category number is IN.
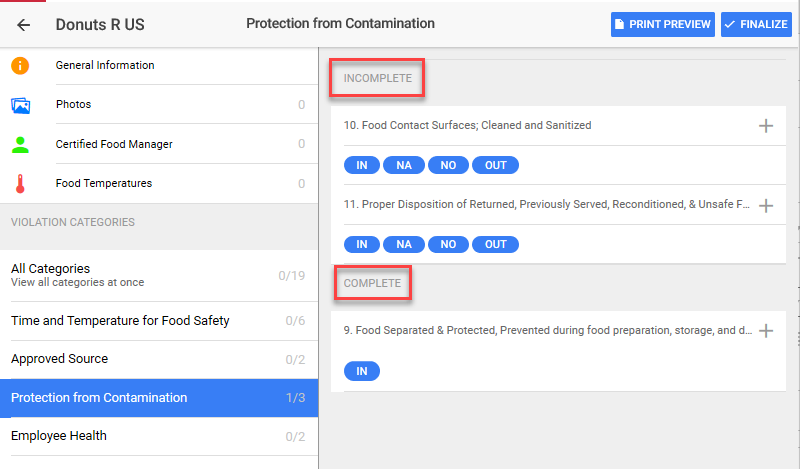
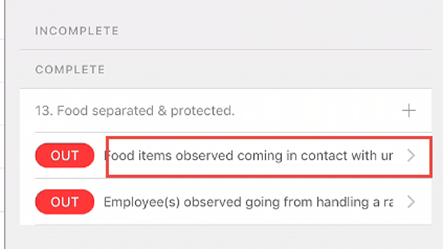
- The next violation number in the category is displayed at the top. And the “count” is kept beside the category listed on the left hand side:
- How to complete an N/A or N/O or another observation name that is not a violation:
- Same as IN. See instruction number 2 above.
or…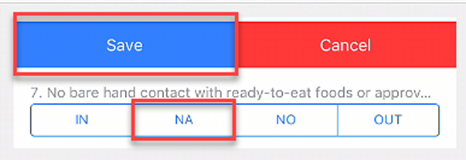
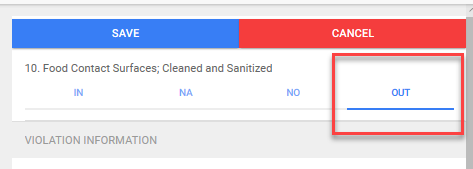
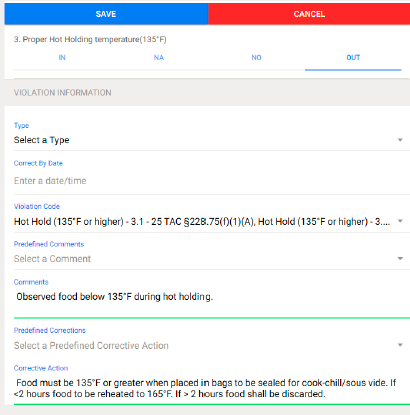
- How to complete an OUT:
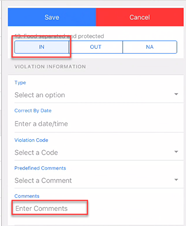
- Select OUT.
- Fill out the Violation Information:
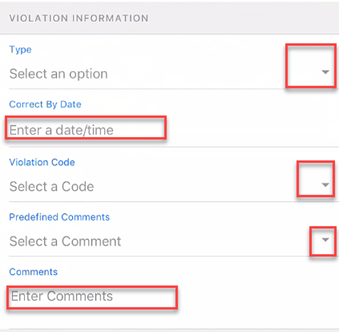
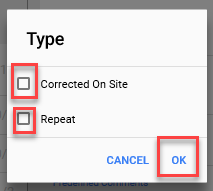
- Select Corrected on Site or Repeat if that situation applies. Then touch OK.
- Touch Enter a date/time to add the Correct by Date if needed.

- Select a (Violation) Code by touching Select a Code. (Not all inspections have codes)

- The Violation Code box is displayed with one or more Violation codes.
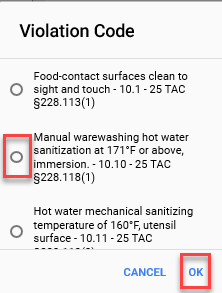
- Press to tick only one violation code. The code will be highlighted in blue. Press OK.
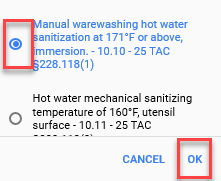
Now some of the text of the violation is shown in the display.
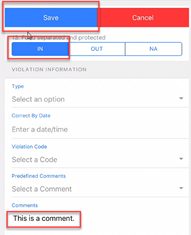
- Make sure the correct code is displayed and then press Select a Comment in Predefined Comment box if available.

- The Predefined Comments are displayed if this feature is being used. Tick one and press OK. The comment is displayed under Comments.
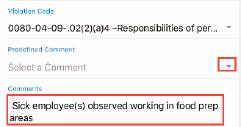
Example - If you want, click on the box to edit the comment or press Cancel instead of OK and type or speak your own comment after tapping in the Comments box.
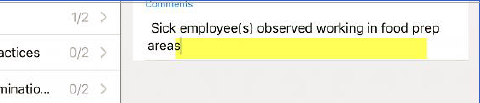
- Click on Save to record the violation.
- The Violation categories are available for the next selection or another violation in the same number may need to be chosen.
Selecting Additional Violation Codes from the Same Number
If more than one violation code from the same Violation Item must be entered:
- Select the individual Category from the left side of the screen.

- Press the Plus sign to the right of the Violation Code “Select a Code” box.

- Repeat the steps to mark as OUT.
NOTE: If an IN, OUT, NA or NO was marked and completed with errors or was saved before being correctly completed it cannot be easily undone in the All Category display.
Editing (modifying) a Saved Violation
- Pick the category from the side.
- Press in the violation box you want to change: such as add a comment, add a date to be corrected by or fix a typo.
Deleting a Violation or Other Violation Record-to be updated after task 707442706
- To delete a violation, make sure to be in the individual Category display and then:
SWIPE FROM THE RIGHT OF THE VIOLATION DISPLAY TO THE LEFT, TO SEE THE DELETE ICON.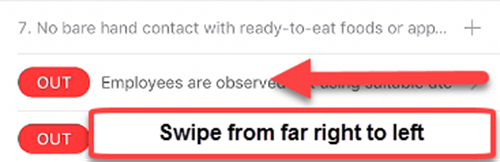
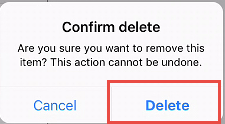
- Press on Delete.
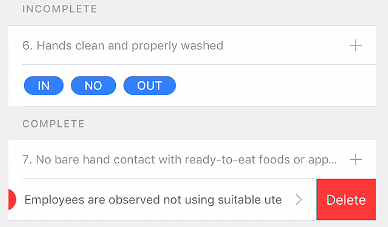
- Choose Delete from the dialog box or Cancel.
- The category number must now be completed again.
History Information
When a number is displayed, if there were violations in previous inspections, a history icon will be displayed. 
The newest will be displayed on top. This will help with ascertaining if the violation in question is a Repeat. This is another reason to make sure you have made complete comments in order to identify which violation should be cited as a repeat.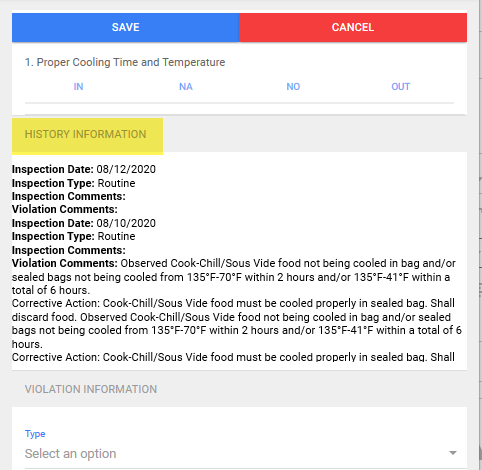
Exiting and Returning to an Inspection
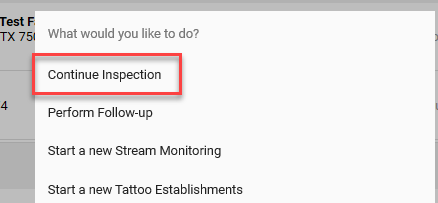
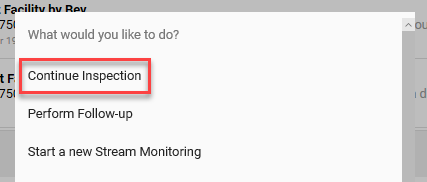
- At any time, touch the Back button to return to the List from an inspection.
- From the list, select the inspection and select Continue Inspection from the top of the menu.
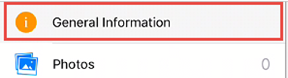
Completing the Other Menus
Samples of other menus are:
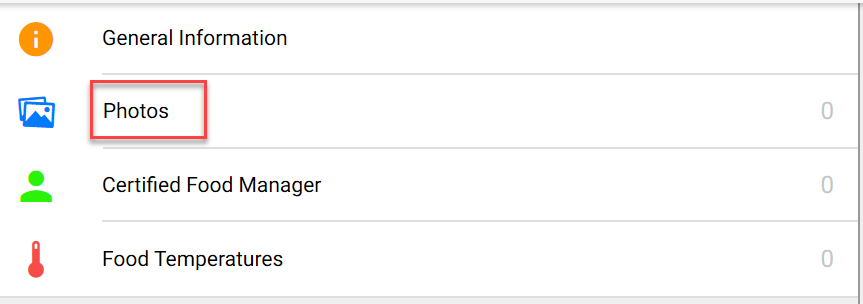
General Information is a client's custom inspection data fields and Photos is a default features; Warewashing; Equipment; NPSA Survey, Food Temperatures; and Time Reports are all examples of compiling lists of data called Child Tabs. (This is to show the functionality. All of these are custom designed for clients)
- General Info (examples)
- Inspection date
- Select a date from the calendar, move to next choice. Data is saved.
- Sanitarian/Inspector
- Select the Inspectors name from the dropdown list.
- Purpose
- Routine could be the default but many choices would be available in a dropdown list.
- Time In and Time Out
- Spin the wheels.
- Follow up required?
- Select Yes or No. (This is usually a required field)
- Follow-up date
- Select from the calendar.
- Comments
- Enter specific comments for the operator.
- PIC signature –HAVE THE PIC SIGN FIRST AND SAVE BEFORE THE INSPECTOR SIGNS.
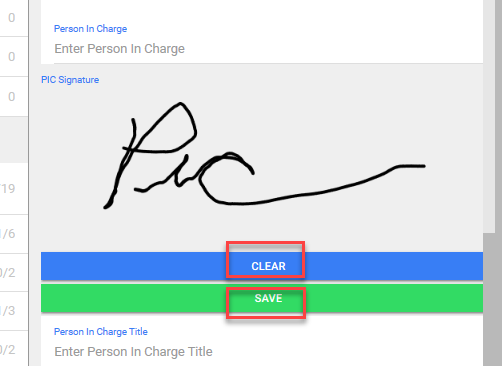
- Have the Person in Charge sign their name.
- THE SIGNATURE MUST BE SAVED WITH THE SAVE BUTTON. Otherwise, will have to be re-entered.
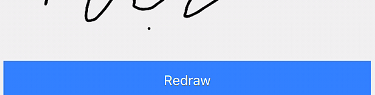
- NOTE: The signature can be redrawn after saving, before finalizing the inspection.
- Person in Charge
- Type the name of the person in charge. The keyboard will pop up and may temporarily cover the field. Continue typing.
- Person in Charge Title
- Type the PIC’s title within the business.
- Inspector Signature
- Sign your name.THE SIGNATURE MUST BE SAVED WITH THE SAVE BUTTON. Otherwise will have to be re-entered.
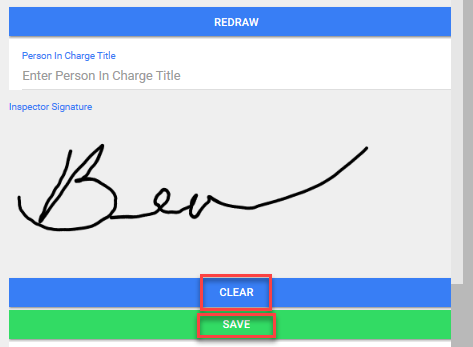
- NOTE: The signature can be redrawn after saving, before finalizing the inspection.

- Sign your name.THE SIGNATURE MUST BE SAVED WITH THE SAVE BUTTON. Otherwise will have to be re-entered.
- A Score may be displayed
-
- Do not overwrite, it is a calculated field.
-
- Inspection date
-
-
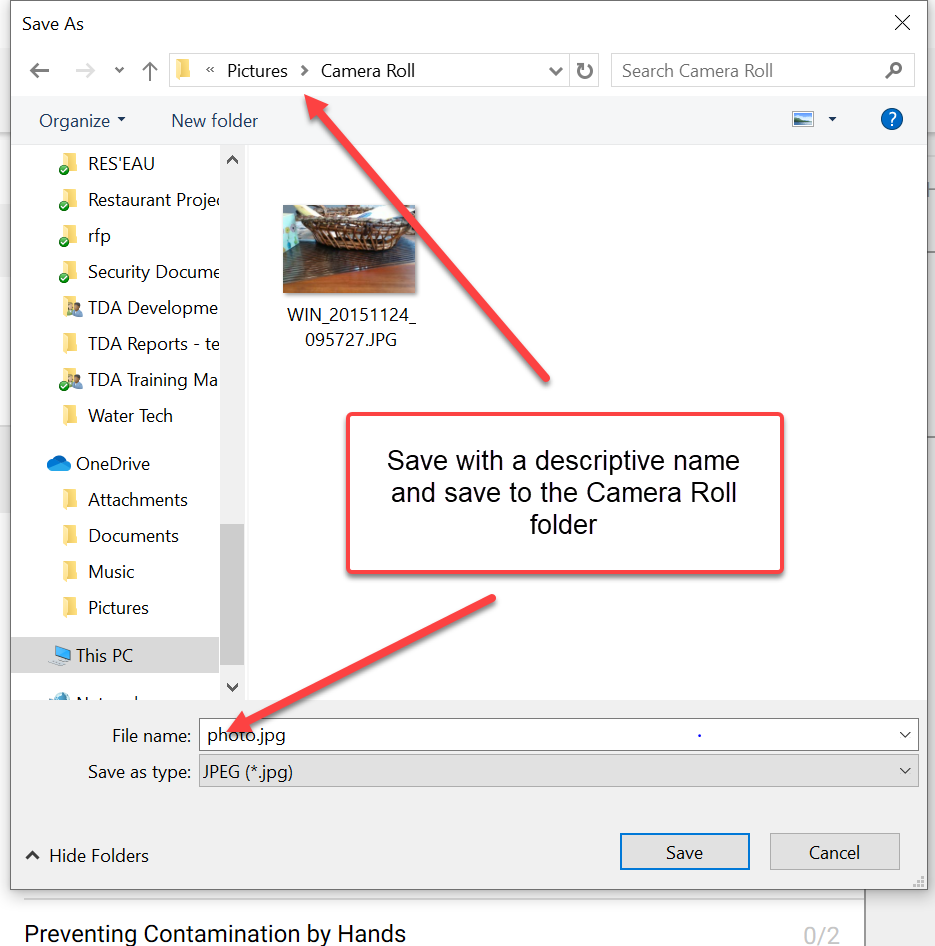
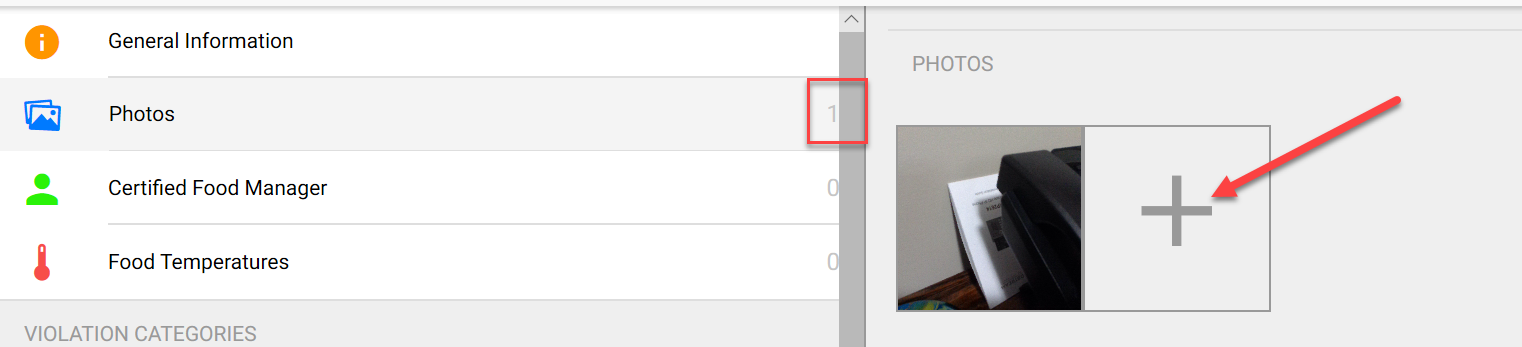
Photos (This example was created with a Windows Surface Pro)
-
Touch or click on Photos:
-
Add with:

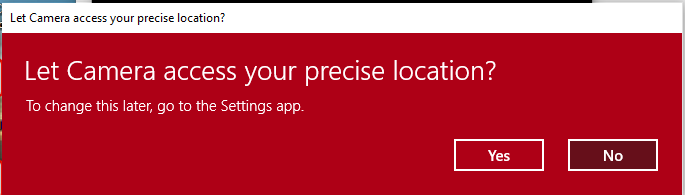
Select “Take Photo”(for Take Photo, access to the camera must be given) or “Camera Roll” (for Camera Roll, access to Photos must be given).

-
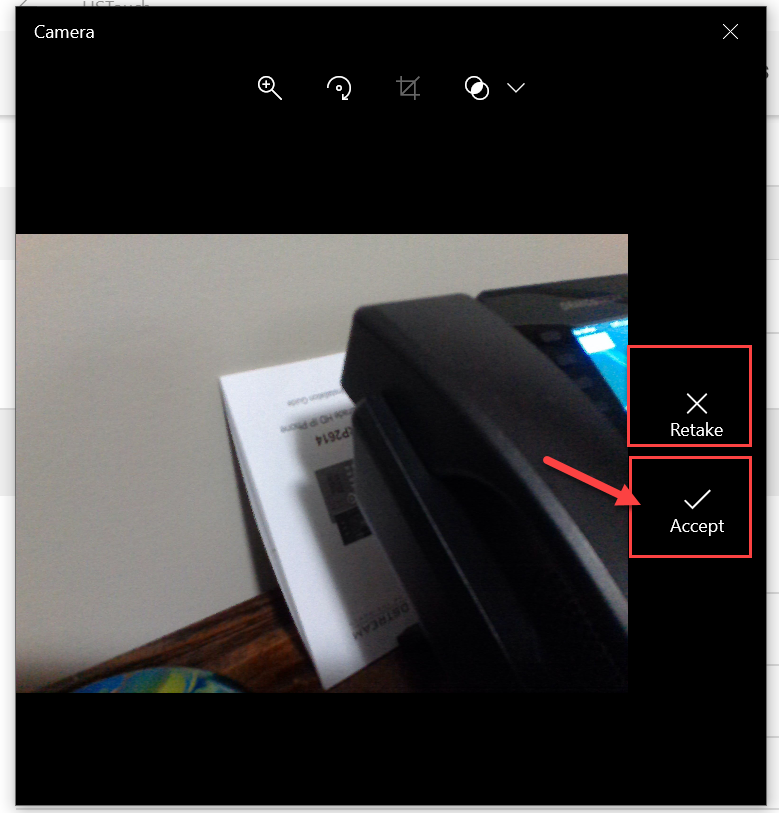
For “Take Photo”, take the picture and either “Retake” or “Use Photo”.

-
Save to your device.
-
The Photo will be added and another can be added.
-
-
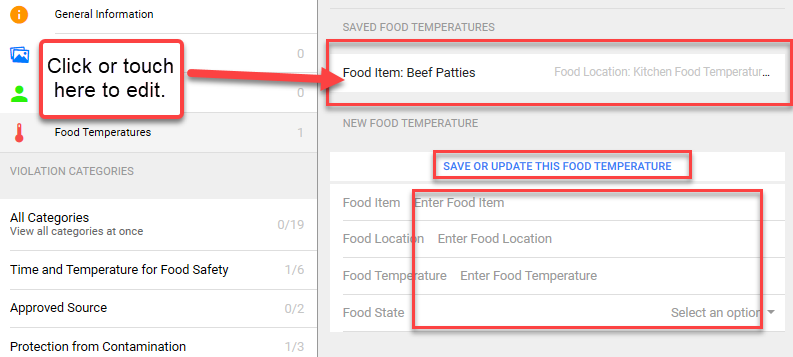
Food Temperatures, Pool data, etc.

-
-
-
-
- Type or “Say” to complete the form and touch "Save or update this ...." button.
- The form must be saved to be entered and is displayed near the top of the page.
- Add additional records and Save each one ("Save or update this ....").
- Type or “Say” to complete the form and touch "Save or update this ...." button.
-
-
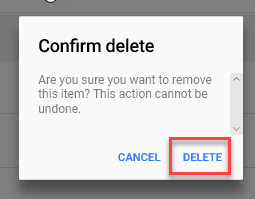
At any time you may delete a record by swiping from the left and touch Delete. -to be updated after task 707442706

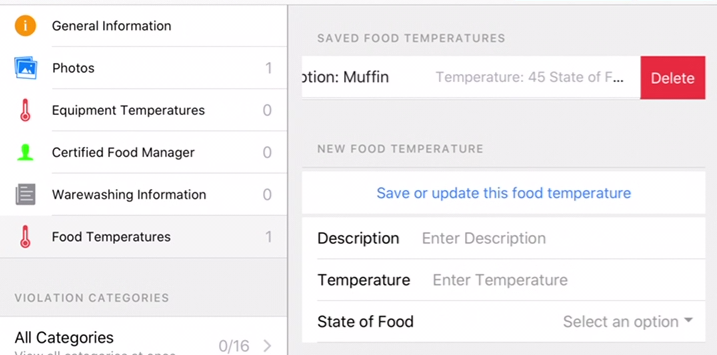
Confirm Delete to remove the record: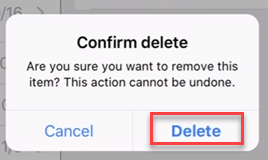
Previewing the Print Report
The printed report can be viewed at any time during the inspection. It is a good idea to preview to make sure that all information has been entered correctly. The form is static so the Violations display will overflow to a separate new page if too numerous to fit in the allowed space.
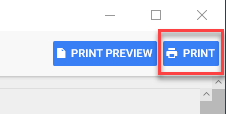
- Touch on the Print Preview button at the top right of the screen.

- Scroll through the pages of the report.
- Use the blue Back button to return to the inspection entry to make any corrections while viewing the Print Report.
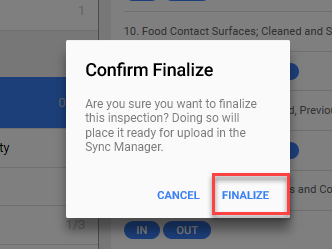
Finalizing, Uploading and Emailing the Inspection Report
Once the Printed Report is deemed complete, the inspection is finalized for emailing and syncing of the data to HealthSpace Cloud.
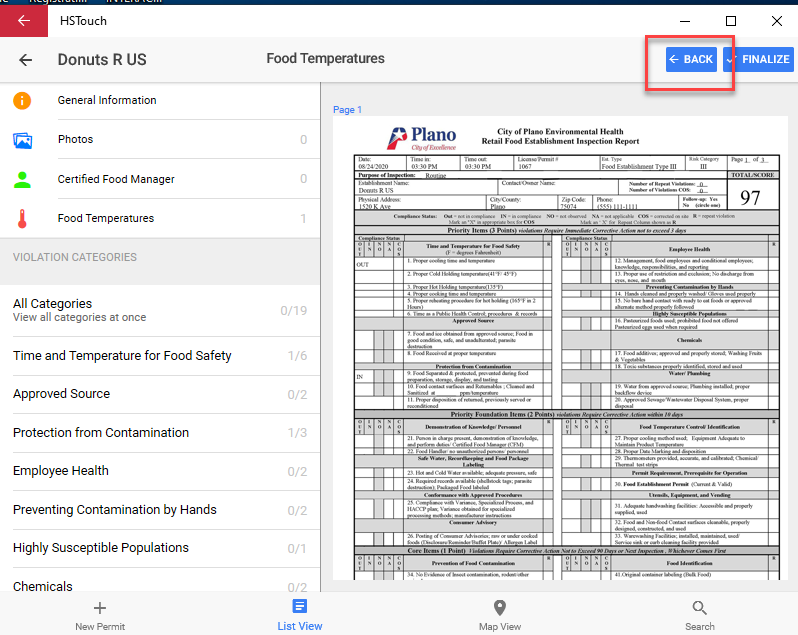
- Press the Back button to return to inspection entry view.

- Press “Finalize” at the top right side of the screen.

If any mandatory fields have not been completed a message will appear.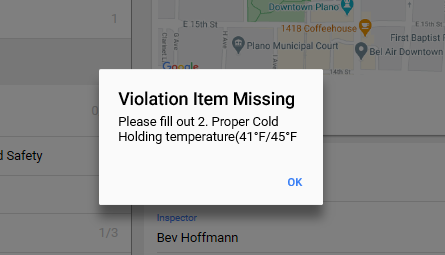
Make any edits necessary and try again. - Press Finalize to accept this message:
- If the app is connected to the internet, this message will appear:
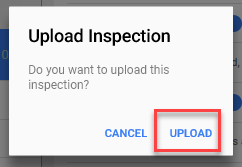
- Click on Upload as shown above. The Sync Completed prompt is displayed. Click OK.

The screen remains the same except for the button that was “Finalize” is now showing “Print”.
If the inspection was exited at this point, by selecting Cancel, the record now shows under the heading “PENDING UPLOAD INSPECTIONS” on the List View. (Screenshot not exact)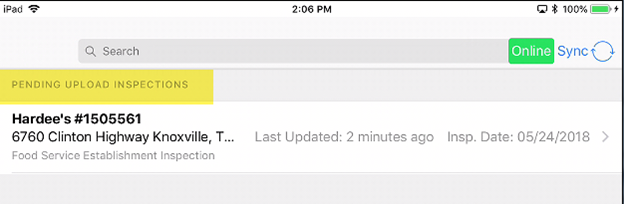
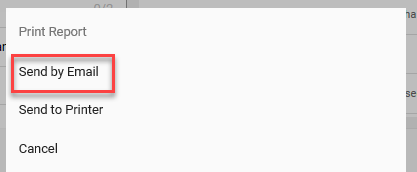
If you are connected to the internet and selected Upload, you can now send emails of the report. - Press the Print button to email or print.
- Select “Send by Email”.
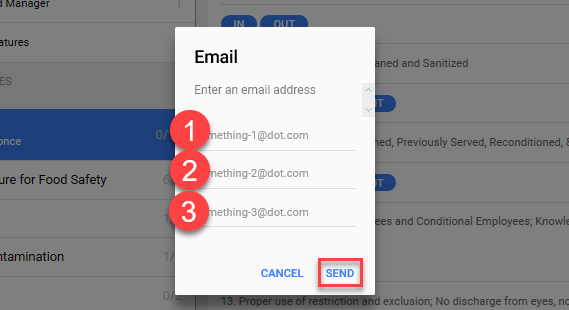
- Fill in up to 3 email addresses and press the Send button.
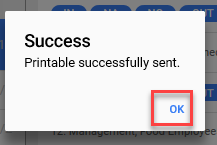
- The progress of the email is displayed and then a message is shown that the email has been successfully sent. Click on OK.
If you didn’t send it to yourself, do it now. If the data is deleted before it is properly uploaded to the Cloud, the data will no longer be stored in the device. - Press the Back icon , to go back to the List View.
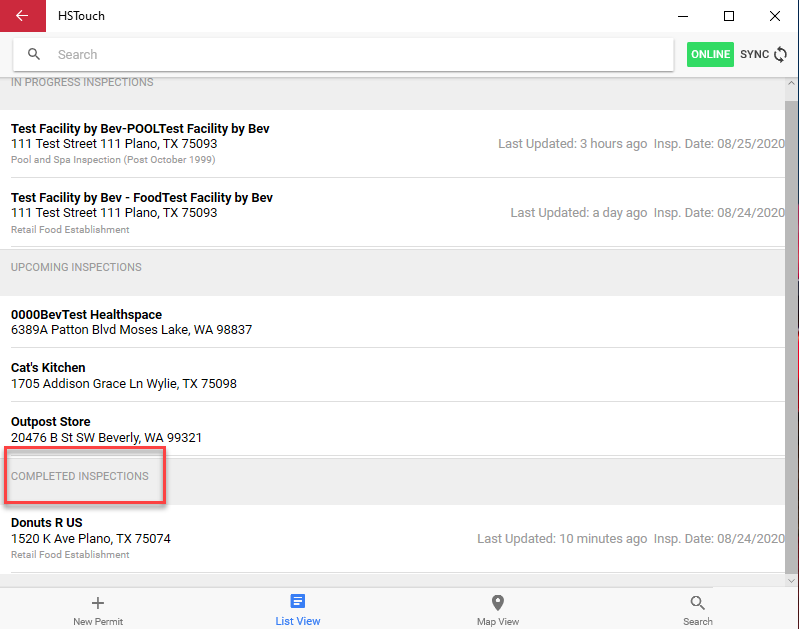
Note that the facility is under the heading “COMPLETED INSPECTIONS”.
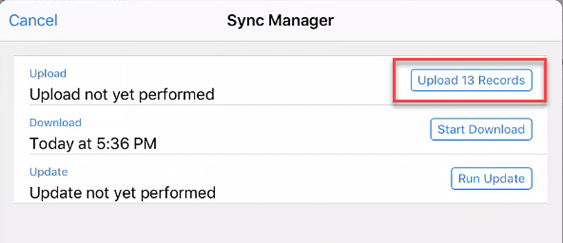
Uploading Data to HealthSpace Cloud from the Sync Center
The Sync Center menu is used to upload the inspections, that were left not uploaded at the time of finalizing, to the Cloud. (Screenshots are not exact in most of this section)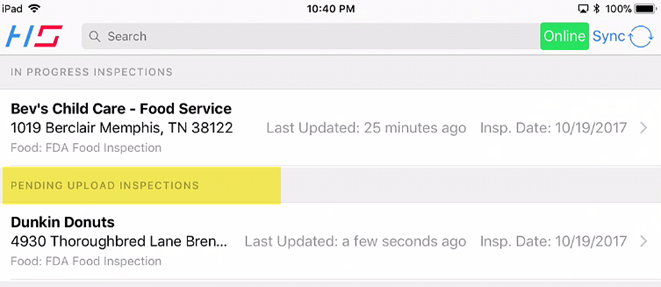
Once the data has been sent to the server successfully, the Facility record can be removed from the COMPLETED INSPECTIONS list (Not shown). It is important to ensure that, in fact, the data has synced with the Cloud by paying attention to any messages on the HSTouch screen during upload.
We recommend uploading a Facility inspection before doing the next one in case of any problems. That means finalizing and sending data to the server. If the internet connection is weak, keep uploading the inspections, one-at-a-time after each inspection!
If an upload is unsuccessful because of User error, the report can be edited to make the corrections and then re-uploaded.
To send data to the HS Cloud using the Sync Center:
- Make sure the PENDING UPLOAD INSPECTIONS are visible in the List View. This shows which records have or will be sent to the server.

- Press the Sync menu.

- Select “Upload xx Records” from the menu.
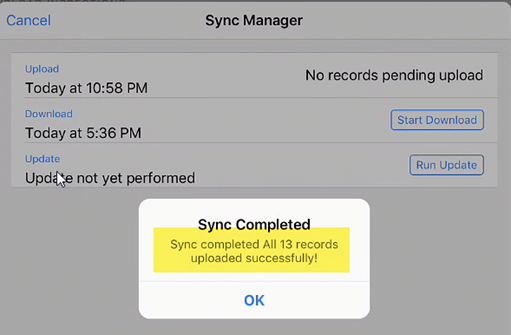
- Watch the progress of the upload.

- Look for this message:
Sync completed All XX records uploaded successfully!
Correcting Data Input Errors
Here is an example of an error message due to user error.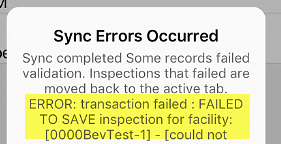
- If you see anything else other than the successful response, the data will not be uploaded. TAKE NOTE OF THE ERROR AND FOR WHICH FACILITY; CORRECT THE ERROR AND RETRY. If the message is a system error, contact HEALTHSPACE.
HINT: Take a screenshot. - Select the facility where it now sits again, in ‘IN PROGRESS INSPECTIONS’ and choose “Continue Inspection” to get back in to make corrections.
- Repeat from Finalize to the Upload procedure until it is successfully uploaded to the Cloud.
Resending Records from HSTouch
This should not be necessary, but if you are sure the inspection did not in fact, sync to HealthSpace Cloud, this option is available: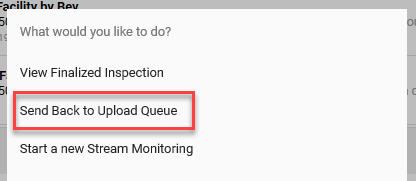
Back to Table of Contents
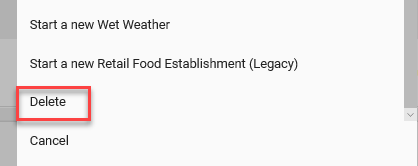
Removing Records from HSTouch
After the Completed Inspections have been uploaded, they remain in the COMPLETED INSPECTIONS list (the screen may need to be refreshed to see this) until removed. If more records are added to the COMPLETED INSPECTIONS, the previously uploaded records will not upload a second time. Any record can be removed from the List View screen this way.
- Touch the the inspection in the list and select Delete from the very bottom of the inspection type choices:
- Touch the Delete button. For both methods, this message is displayed:
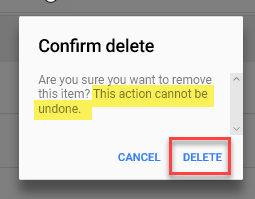
Note: THIS ACTION CANNOT BE UNDONE! - Touch the Delete button to delete the Inspection or location record.
Conclusion
Check often for new updates for product performance, enhancements and new features from the Microsoft Store.
This manual was created for use with a Windows 10 device and to be used with the HealthSpace Touch app. See other manuals for working in HealthSpace Cloud.